
Last updated on January 8, 2019, 3:07 PM
Easily measure scroll depth or scroll depth with Google Tag Manager
How much of my site does a user actually view? Online marketers and website maintainers ask themselves this question quite often and the “scroll depth” metric provides answers. Measuring the scroll depth can provide interesting insights, especially for longer one-pager (start) pages or long text pages. When it comes to a branding goal in content marketing, scroll depth can be determined as an important KPI. Publishers and bloggers should take a closer look at this metric to get useful conclusions about the success of their content.
To see how far or how “deep” a user scrolls down a long page, Google Tag Manager offers an interesting solution. Many other tools such as Hotjar have been able to do this for a long time and it has also been possible to measure scroll depth with a Google Analytics script for a long time. But the Tag Manager now makes implementing tracking super convenient.
-> Set up and use Google Tag Manager -> Install Google Tag Manager in WordPress
Table of Contents:
[Why you should measure the scroll depth / scroll depth] Set up scroll depth measurement in Google Tag Manager 1. Activate scroll variables in GTM 2. Set up Scroll Depth Trigger [3. Set up scroll depth tag that is triggered by the trigger in GTM] 4. Preview of the scroll depth tag and trigger on the website
Why you should measure the scroll depth at all
Scroll depth provides an overview of how much of a page is actually “consumed” by visitors. This metric makes a lot of sense, especially for detailed and long editorial articles. This makes it possible for the editor to see exactly how far the users are actually reading or whether there are certain places in the text where they simply stop.
It also makes sense for long one-pager websites or long home pages to track how far down the page users move. Because if the Call to Action is at the bottom and you see that almost all users only go down 50% of the page, you should perhaps place the call to action higher up :)
Another important argument for the scroll depth is the very inaccurate measurement in Google Analytics of the time spent on one-page pages. Because if there is no second page or subpage that the visitor can jump to, the length of stay will not be calculated correctly. The Scroll Depth metric should therefore not be missing from the KPI arsenal for modern online marketing.
Set up scroll depth measurement in Google Tag Manager
But now let’s get down to business, here are the short and crisp instructions on how you can implement scroll depth with the Google Tag Manager (GTM for short) and measure and track it in Google Analytics.
1. Enable scroll variables in GTM
As already mentioned, the scroll variables in Google Tag Manager are relatively new. They are disabled by default and to use them you must first enable them.
To do this you simply have to click on variables in the GTM and then click on “Configure”

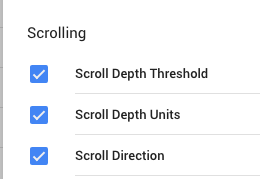
You then have to scroll down a bit in the selection and then select and activate the following variables (there is no save button here, so you can simply go back after selecting).
2. Set up scroll depth trigger
After the variables are activated, a trigger must be set up, which is always triggered when a certain scroll depth is reached.
To do this, click on Trigger -> New

The trigger type must then be selected. Here Google has provided the “Scroll Depth” type for the Tag Manager. So give the trigger a name, e.g.: “Scroll Depth Trigger” and then select the Tigger type = in this case “Scroll Depth”.

The next step is to configure the trigger more precisely. There is the option to measure vertical or horizontal scrolling. In our case and example, vertical (i.e. downward) scrolling is measured.
Therefore, we select (check) “Vertical Scroll Depths” and then the input window for the “Percentages” opens immediately below. Here you can enter how granularly we want to measure the scrolling. The most common are increments of 10, i.e. 10, 20, 30, 40, 50, 60, 70, 80, 90, 100 or increments of 25, i.e. 25,50,75,100

We choose the 25% steps and therefore enter: 25,50,75,100, ! IMPORTANT: there must be no space between the dashes and numbers. This means that the trigger fires when 25% of the page has been scrolled down, when 50% of the page has already been seen and “scrolled through”, etc. i.e. when 75% and 100% have been reached. The trigger fires 4x when a user has scrolled all the way down.
In the example “All Pages” are selected. That would mean we activate the trigger for all of our pages where the GTM code is installed. If you only have a one-pager website you can choose this option.
If you only want to measure certain sub-pages or categories, such as all blog sub-pages, with scroll tracking, you can easily set this by selecting “Some Pages” and specifying which pages the trigger should fire on.

But if I have a lot of subpages and only want the trigger activated on my home page, you can use the “Page URL” and “equals” condition. This means that the trigger is only set to active on exactly the page that you enter.

Then don’t forget to click on “Save” at the top right :) and the trigger is already configured.
3. Set up the scroll depth tag that is triggered by the trigger in GTM
However, the trigger alone cannot be recognized or processed by Google Analytics. Therefore, a Google Analytics event tag must be created, which is triggered by the trigger.
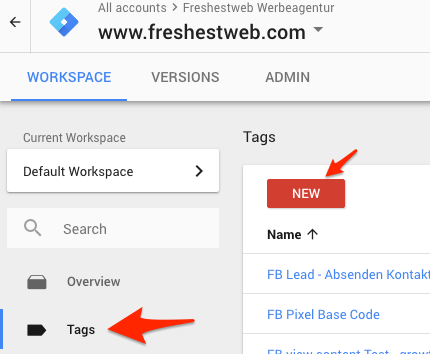
To do this, go to Tag -> new
Then select Tag Type -> Universal Analytics

and then choose a name for the day again, e.g.: “Scroll Depth Tag”.
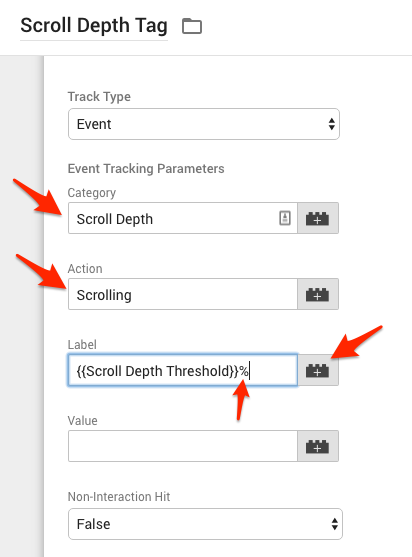
The next step is to change the track type. Instead of the standard Page view setting, we have to select Event here.

The next step is to fill the fields that can pass additional information about the event to Google Analytics. My suggestions for filling are:
- in the text field Category: “Scroll Depth”
- in the text field Action “Scrolling”
- In the Label field -> click on Plus symbol and select Scroll Depth Threshold from the list. Afterwards, it is a good idea to add a % sign in order to have a nice display of the event label with 25% or 50% etc. in Google Analytics.
Next you have to select which Google Analytics (GA) account should “get” the event tags :). If you haven’t defined a settings variable for GA, you can choose the easy version

Select “Enable overriding settings in this tag” and then enter the Google Analytics ID in the field.
Now it’s finally time for the trigger. This is selected by clicking on the large area here.

The selection of all already created and available triggers then pops up and you select the previously created “Scroll Depth Trigger”.

Then don’t forget to “SAVE” again at the top right, and tadaaa the tag is also ready.
4. Preview of the scroll depth tag and trigger on the website
Using the preview function in GTM you can now check whether the trigger and the tag work properly and do what they are supposed to do :)
To do this, click on Preview at the top right.

Then switch to your own website where the scroll depth should be tracked and the tag activity should be tracked in the preview window that opens at the bottom of the screen.
The best way to do this is to switch to the data layer view and follow how gtm.scrollDepth is triggered when scrolling.

If it already looks good in the preview, then you just need to click on “Submit” in the top right corner of the GTM and thus “arm” the trigger and tag.
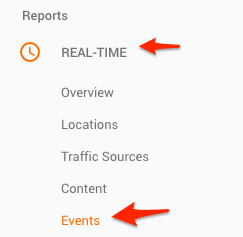
You can then follow the events live in Google Analytics in this view: Real time -> Events
![]()
So much for quickly installing scroll tracking / scroll depth with Google Tag Manager. Of course, there are a few other gimmicks and variants here. There will be more on this here on the blog in the future.
If you have any questions just write -> Contact
Don’t miss any more blog posts? Click here to register for our newsletter.